Reports are a great tool in SET which can be used to create lists of contacts, organisations, opportunities or activities. To create a new report in SET first click on the “Reports” button on the main drop down menu in SET. You will then be presented with the main reports page. Here you can create a new report, view reports you have saved in SET, or view reports that have been shared with you by another user in SET. To create a new report, click on any of the four yellow buttons at the top of the reports page. Each of these four buttons allows you to create a report centred around contacts, organisations, opportunities or activities. This decision will affect the fields you are able to view in your report, so choose wisely when creating a new report! If you would like to see your sales figures, create an opportunity report. If you are looking for information regarding individual contacts, then a contacts report is the way to go.
Customising Your Report
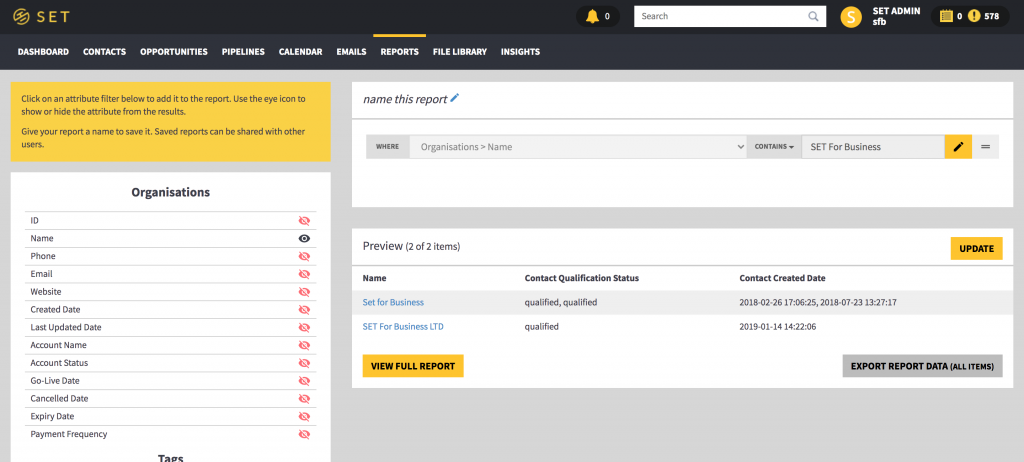
Once you have chosen which type of report you are looking to create, you will be taken to the report creation page. Along the left of the page, you will see a selection of fields to choose from. This list will contain any field related to the type of report you are looking to create. For example, if you are creating an opportunity report, you will be able to select ay field related to an opportunity.
On the right side of the page, you will see a preview of your report. This will show you a preview of each of the fields currently shown in your report (in each of the columns) and the first ten records in this report.
To add any of the available fields to you report, click on the red eye next to the field. This should turn the eye black. Next, click on the “Update” button on the right side of the page, and your field will appear in your report. If the eye next to a field is already black, click on the icon to turn it red, and click on the “Update” button and your field will be removed from the report.

Adding Searches to Your Report
You can also search for specific data in a report. You can create a search by clicking on one of your available fields on the left of the page (the text, not the eye icon). This will have added a new search bar at the top of the reports page, above your report preview.
This new search can be customised in a number of ways. When you add your first search to a report, you will see a grey box containing the word “Where”. This can be changed to other conditions such as “And” or “Or” when you add further searches to your report. This would allow you, for example, to search for a contact named “John”, or a contact named “Katy”, using the “Or” condition when searching for a “Contact First Name” a second time. You can add a second search by repeating the process of clicking on a field along the left of the page.
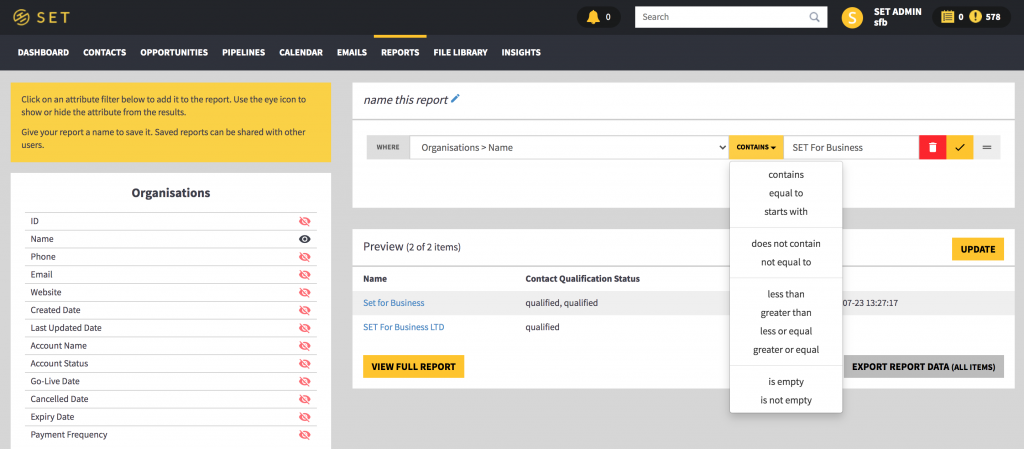
The second way a search can be modified is by changing the type of search you are carrying out. This is a dropdown option next to the field search text box. As a default, this option is “Contains”, but can be changed to the following options:
- Contains – This is a simple search, which looks for any record which has a specific field containing whatever is typed into the associated search box. Searching for the First Name “Jon” would display contacts named “Jonathan”, as well as those named “Jon”.
- Equal To – This searches for EXACTLY what has been typed into the associated search box, and nothing else. Searching for the First Name “Jon” would not display contacts named “Jonathan”, only those named “Jon”.
- Starts With – This searches for records which have a specific field starting with whatever is typed into the associated search box. This is another case where searching for the First Name “Jon” would display contacts named “Jonathan”, as well as those named “Jon”, but it would strictly only display records with a first name STARTING WITH “Jon”.
- Does Not Contain – This search displays all records which have a specific field that DOES NOT contain whatever you are searching for.
- Not Equal To – This search displays all records which have a specific field that IS NOT equal to whatever you are searching for.
- Less Than – This search type can be used for a number or a date. In the case of an “Opportunity Value”, this would display any opportunity which has an associated value of LESS than what you have searched for. In the case of a date, this would allow you to search for any opportunity with an “Expected Close Date” which is BEFORE the date you have searched for.
- Greater Than – This search type can be used for a number or a date. In the case of an “Opportunity Value”, this would display any opportunity which has an associated value of MORE than what you have searched for. In the case of a date, this would allow you to search for any opportunity with an “Expected Close Date” which is AFTER the date you have searched for.
- Less Or Equal – This search type can be used for a number or a date. In the case of an “Opportunity Value”, this would display any opportunity which has an associated value of LESS OR EQUAL than what you have searched for. In the case of a date, this would allow you to search for any opportunity with an “Expected Close Date” which is BEFORE OR ON the date you have searched for.
- Greater Or Equal – This search type can be used for a number or a date. In the case of an “Opportunity Value”, this would display any opportunity which has an associated value of MORE OR EQUAL than what you have searched for. In the case of a date, this would allow you to search for any opportunity with an “Expected Close Date” which is AFTER OR ON the date you have searched for.
- Is Empty – This type of search does not require you to type anything into the related search box. Simply select the “Is Empty” option and click on the tick to the right of your search, and this will only show you records which have a specific associated field that is empty.
- Is Not Empty – This type of search does not require you to type anything into the related search box. Simply select the “Is Not Empty” option and click on the tick to the right of your search, and this will only show you records which have a specific associated field that is not empty.

Once you have selected which field you would like to use for your search, and the type of search you would like to carry out, all that remains is to type whatever you are searching for in the search box which has appeared on screen. Once you have done this, click on the yellow tick next to your search to add this new filter to your report.
The final option you have when adding searches to your report is to change the order of your searches. If you are searching for contents of multiple fields, you can click on the grey button to the far right of each search to drag the filter into a different order. This is only relevant when using search conditions such as “And” or “Or”.
Changing Your Searches
Once you have added multiple search conditions to your report, you can edit these by clicking on the yellow pencil button next to each search. Once you have clicked this, you will be able to edit your search, save your search by clicking on the tick icon, or remove the search by clicking on the bin icon.
Generate Your Report
Now that your report is ready for you to view, click on one of the two buttons underneath your report preview to generate your report. At the bottom of the reports page you can click on the “View Full Report” to generate the report and view it online in your browser. The second option is the “Export Report” button in the bottom right corner of the reports page to export your report as a CSV file, which can then be opened in Excel.
Saving Your Report
Now that you have built your report, it may be useful to save this for future use. To save your report click on the pencil icon at the top of the page next to the “Name Your Report” text. Next, type the desired name of your report into the text box, and click “Save”. This report will now be added to the “Saved Reports” section in the main reporting page.
